Tuesday, November 15, 2011

Ending with a Whimper - 5th Firing Oct 2011

I was keeping my fingers crossed that the warm weather would hold until I could do another firing at the end of Oct. It did but the day ended up extremely windy and with all the leaves off the trees the kiln was exposed to the full brunt of the wind whipping through the valley. Maybe that was part of the problem as I could not get that typical chug chug sound from the primary air inlets, instead the flames would come out every time an extra strong gust of wind would blow, but no sound. It was like the wind would blow down through the chimney and out the primary air holes, reversing the normal flow. I have always associated the chugging with reduction. Whatever the reason the results were a real blow to my esteem - no reduction at all,  no chuns, barely any celadons and no carbon trapping - the shinos with the character of a white fish belly. I had also decided not to load the last section - felt that it might help in bringing up the temperature in the middle. 
Last section shelving sloping down to the flue to try and direct the flame lower  in the earlier sections as I find that the top is always a lot hotter and has a lot more ash.

Tall shino pots loaded in the middle section. I did another pot with the tethered dove theme. I love making large bottle forms but they do not sell very well.

The chuns blue (Jun 4 over Temmoku) ended up just a shiny brown, the butternut bowls grey, the ones on the left a grey transparent that should have had a hint of blue green and the ones on the right were supposed to be a darker celadon blue-green.

The bottom front section - the two small bottles on the left were the only ones with some nice orange flashing, but that was probably due to the fact that I brushed them with ash water and soda water first. All the shinos were mostly just a pale beige.


Anyway blocking the last section and trying to get the flames lower did not work - the bases of my tall pieces were all unfired compared to the tops. The tail end of the kiln was colder than normal compared to the front - again leaving out the pots in that section did not seem to help either. Anyway I will have all winter to try and figure out what I did wrong and to gear up enough energy to repeat the firings again in the spring.

Thursday, November 10, 2011

Fourth Firing - Heat and Humidity - Sept 2011

We had been spending a lot of time on our farm, making trails for the woodlot tour in October to see our butternut grove. Butternuts  in North Anerica are all dying from a canker and so have been put on the endangered speices list. The search is on for a canker resistant tree - so far over 8000 trees over a wide geographic area have been examined by researchers and maybe only 4 are showing sign of recovery. These may then become the parents of future resistant trees if the trait proves to be genetic and can be passed on to future generations.

As a result of all the trail clearing I got a lot of white pine branches cut into firewood for my wood kiln. In addition I bought a truckload of cedar slabs in June hoping that they would dry a lot faster than any cedar cut this year.
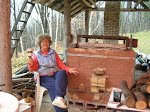
Wood storage - cedar slabs on the left
Malcolm Davis Shinos ready to go into the wood fire - the large plate dunted in the firing - seems like it was on the way up as the glaze had run down the broken edges a bit. I think that I preheated too hot the night before and then let it cool before starting again the next morning.
I managed to get this firing in before the end of summer which has been very hot and humid. With all the humidity the shino glazes did not want to do their thing - that is getting that crusty white soda ash look from the soda ash migrating to the surface. To speed up the drying process I had heat-gunned the interior of my tall slab vases and then blocked the tops with plastic bags, thinking this would force the soda to the outside surface. This did not seem to work as little soda ash ended up on the outside surface, much less than normally. Thinking back, heating the interior would really have wicked the soda ash to the inside surface, even if the tops were blocked and the interior could not dry quickly. It would have been better to sweep the heat gun on the outside surface. The test that I had done at MISSA two years ago when I had placed the shinos in different situations - what worked the best was to place the pot in a sunny and windy location and you got great crusting patterns.

Below shows a test to see how ashes affect the cones - both are cone 10 - one was capped by the pot and the other was outside it. It seems like they were equal which is good to know, but maybe the outside cone was not subjected to too much ash where it was placed. I will have to repeat the test in the very front where there is a lot of ash.


I got some great chuns - on the left Jun 4 over Temmoku turned out a vivid blue/purple and in the front section some super carbon trapping - totally black except where for wax resist brush marks. This was MD shino without the Red Art and it results in more white instead of orange over porcelain. Unfortunately the tall vases ended up mostly an ugly shade of orange brown. I will have to try and refire them in the gas kiln. I am having trouble understanding why one pot gets it while another one next to it hardly any at all.
This time some of the carbon trapping also ended up as even speckling - rather like granular managnese, even where there was applique or lacquer resist/carving that was waxed out. I guess that is what makes shinos so exciting!


I

Monday, November 7, 2011

Third Firing of the Newfoundout Kiln - June 2011

The end of June firing was great - it was very hot and sunny with no wind. It was the first time that I was able to use a lot of pine, mostly white pine branches and I side stoked with 1x 2 lumber strips that my husband no longer wanted. The temperature reached cone 9 at the chimney end, but I think I really overshot at the front end as cone 11 ended up in a puddle, though with wood firing you can never be sure how much the ashes are affecting the cones. The colour in the kiln near the end at times was white, white, white - I have never seen it that bright so it may have reached cone 13. In addition many glazes turned a shiny transparent, like a celadon. 
Wood Fire BMix - Watercolour Green brushed on and rubbed off, then glazed with Stony Yellow, Hannah Blue and Ochre Ash glazes. You can see the copper from the Watercolour Green was reduced to red - maybe the blood part of the blood sweat and tears that those early settlers when through in the Newfoundout.
The pots pictured are glazed the same, except one is Bmix woodfire clay and the other out of Smoothstone - a stoneware clay -  and fired in a gas kiln to cone 10.
Stoneware clay with the same glazes as above but fired in the gas kiln.
Every time we drive up the kilometer long steep hill into the Newfoundout - that high valley where our farm is located, I think of how those first settlers in the 1880's must have struggled up that hill to claim their land holdings. I wonder what were their first thoughts when they finally arrived - disappointed, happy, apprehensive? By the 1950's they sure must have been disappointed - as the whole valley, the Newfoundout - where at one time 16 families lived was abandoned. I am trying to do a series of pots that reflect some of that.

Handbuilder Extraordinaire - Vince Pitelka - MISSA Part IV

The second week was handbuilding with Vince Pitelka and learning all sorts of new techniques. I have never been a fan of coiling as I find it too slow for my impatient personality. However Vince's technique for making large storage jars that he learned years ago from a Nigerian student made for a much faster and satisfying experience as well as resulting in a very strong pot. All of us in the workshop managed to make these very large jars by the end of the week. You do have to leave time for drying as there was only so much height that can be accomplished each day.

Detail of the tethered bird

My large coiled jar
In between coiling sessions we were shown his system of building boxes using a template system of squares, rectangles and triangles of graduated sizes. His method of making templates for flaring tumblers was new to me - using two different lengths of radii - by using a very large homemade protractor.

Two of his best tips - spray the table top with water, smooth on your canvas and you have a ready made working surface. If the canvas moves, just respray. Now there is no need to carry around a thick sheet of canvas covered board - just the canvas. 

My handbuilt mug with paddled rim
And the second tip was the best, at least for me. Slab built vases, cups, etc. I  always felt had a weakness - their rims. It is very difficult to thicken the rim evenly and effectively. Vince's method is simple and results in a very nice rim that can compete with any wheel thrown one in terms of adding that finishing touch to the pot. Once the clay is leatherhard, he paddles the rim using a wooden paddle - I use a wooden spoon - using a circular motion and stroking down on the clay rim and going back up to start again. By going around slowly one can build up quite a substantial lip that looks totally natural.


Vince (seated) - with his large coiled jar and working on his signature oil can teapot.

Pots in Motion - Steven Hill - MISSA Part III

Between 1985 and 2000 I had taken a 15 year hiatus from pottery and what a change had occurred in those years!  Brown pots where out, colour was in, throwing rings were replace with trimming marks, iron spots were banished, and static, footed pots were replaced by dancing pots in motion.

The super weekend workshop with Steven Hill embodied all those new things, especially colour and motion! His signature melon pitcher was broken down into various parts - all designed to show motion. Even little details added to the overall effect. And all the parts knit together seamlessly to result in a  spectacular pot. It was not an easy feat for the rest of us to attempt, but attempt with did. Though we may not have had much success we all learned a lot.

His yunomis were an easier project to emulate and I have been making lots of them since I got back as I love making the undulating lip that he showed us. (A yunomi is a form of teabowl for every day use and it is usually taller than wide, with a trimmed foot. You hold it by the rim with your thumb and forefinger and support it with your little finger under the foot.) You can see some of his yunomis with that wonderful undulating and slightly flaring rim here (you need to scroll down past the cups): http://stevenhillpottery.com/StevenHillPottery/TopShelfPottery/Pages/Mugs,_Tumblers,_and_Yunomis.html

Another fun part of the workshop was working with his slip which I had never tried before. Tear pieces of your clay body into small chunks and beat them up with water to a yogurt like thickness, screen and apply to the pot with your hand. Start smoothing, working it with a rib - it's harder than you think to get that fresh, spontaneous look of ripples and drips.  I see that he has a video out now about his techniques called "Surface Techniques with Steven Hill". You can see an excerpt here at Ceramic Arts Daily.
http://ceramicartsdaily.org/pottery-making-techniques/ceramic-decorating-techniques/pottery-video-of-the-week-steven-hills-surface-decoration-with-thick-oozy-slip/ 
Steven's signature melon pot under construction. No one makes a better or more graceful spout than Steven.